Now we will learn how to parameterize the values using User Variables.
For this parameterization also we will use a public site as an example i.e. www.redbus.in.
Follow the following steps :
To Parameterize the Booking scenario, first record the Booking scenario.
1] Add Thread Group Recording Controller and HTTP Request.
In HTTP Request > Server Name or IP : Enter http://www.redbus.in
2] Add a HTTP Proxy Server for the Workbench
 3] Start the Proxy Server and open Mozilla Firefox and go to http://www.redbus.in.
4] After recording a few transactions, close the browser and stop the Proxy server in Jmeter. U get the below recordings.
3] Start the Proxy Server and open Mozilla Firefox and go to http://www.redbus.in.
4] After recording a few transactions, close the browser and stop the Proxy server in Jmeter. U get the below recordings.
 5] Here we have seen the tickets from Mumbai to
 Goa on 07-Dec-2011
 6] Now we will parameterize the values of fromCityName and toCityName using User Parameters.
For this do the following steps:
7] After recording the script first save it.
8] Create a new file in “text document” form in bin folder. 9] Enter the values for each thread or user in separate rows with fields separated by commas as shown in the screen shot.
 10] Save the file as (file => save as) uservar.csv file in the same bin folder.
11] Now in the Apache_Jmeter window go to Options > Function Helper Dialog
10] Save the file as (file => save as) uservar.csv file in the same bin folder.
11] Now in the Apache_Jmeter window go to Options > Function Helper Dialog
 12] Create new function with function type __CSVRead.
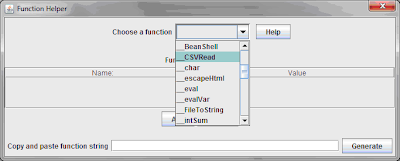 13] In the values column for CSV file to get values from give the file name (i.e. uservar.csv) from where values are retrieved. Give the complete path incase the file is not created in bin folder. InColumn number of CSV file give 0 as user ids are stored in first column and count will be started from “0”.
15] Now again goto Apache_Jmeter window.
Right click on thread group.
Then click on Add > Pre Processor > User Parameters to create a new userparameter. 16] The following window will be opened. Click on Add Variable tab to add a new variable.
17] Now in the name column give the name of the variable you want to replace (fromCityName) as “A” in this example and in the user_1 column paste the function string that was copied previously from the function helper window i.e., (${__CSVRead (uservar.csv, 0)}).
18] To parameterize more than one more variable then click on Add Variable. For parameterizing toCityName filed in Name field enter “B” and in User_1 column paste the generated function but change the column number to 1 i.e.,(${__CSVRead (uservar.csv,1)}).
19] After entering all the values that are to be parameterized click on Add Variable and in Namefield enter “next” and in the User_1 column paste the function string and replace 0 in the string withnext i.e.(${__CSVRead (testdoc.csv, next)}). 20] Find and replace the variable values that are to be parameterized with function strings.
In this example find fromCityName value and replace it with the function string that is ${A} and find toCityName value and replace It with function string ${B}. 21] Save the script and Run the Test.

For this parameterization also we will use a public site as an example i.e. www.redbus.in.
Follow the following steps :
Follow the following steps :
To Parameterize the Booking scenario, first record the Booking scenario.
1] Add Thread Group Recording Controller and HTTP Request.
In HTTP Request > Server Name or IP : Enter http://www.redbus.in
2] Add a HTTP Proxy Server for the Workbench

3] Start the Proxy Server and open Mozilla Firefox and go to http://www.redbus.in.
4] After recording a few transactions, close the browser and stop the Proxy server in Jmeter. U get the below recordings.

5] Here we have seen the tickets from Mumbai to Goa on 07-Dec-2011

6] Now we will parameterize the values of fromCityName and toCityName using User Parameters.
For this do the following steps:
7] After recording the script first save it.
8] Create a new file in “text document” form in bin folder.

9] Enter the values for each thread or user in separate rows with fields separated by commas as shown in the screen shot.

10] Save the file as (file => save as) uservar.csv file in the same bin folder.
11] Now in the Apache_Jmeter window go to Options > Function Helper Dialog

12] Create new function with function type __CSVRead.

13] In the values column for CSV file to get values from give the file name (i.e. uservar.csv) from where values are retrieved. Give the complete path incase the file is not created in bin folder. InColumn number of CSV file give 0 as user ids are stored in first column and count will be started from “0”.
14] Then click on generate option to generate a function. Then copy the function string generated.

15] Now again goto Apache_Jmeter window.
Right click on thread group.
Then click on Add > Pre Processor > User Parameters to create a new userparameter.

16] The following window will be opened. Click on Add Variable tab to add a new variable.
17] Now in the name column give the name of the variable you want to replace (fromCityName) as “A” in this example and in the user_1 column paste the function string that was copied previously from the function helper window i.e., (${__CSVRead (uservar.csv, 0)}).
18] To parameterize more than one more variable then click on Add Variable. For parameterizing toCityName filed in Name field enter “B” and in User_1 column paste the generated function but change the column number to 1 i.e.,(${__CSVRead (uservar.csv,1)}).
19] After entering all the values that are to be parameterized click on Add Variable and in Namefield enter “next” and in the User_1 column paste the function string and replace 0 in the string withnext i.e.(${__CSVRead (testdoc.csv, next)}).

20] Find and replace the variable values that are to be parameterized with function strings.
In this example find fromCityName value and replace it with the function string that is ${A} and find toCityName value and replace It with function string ${B}.

21] Save the script and Run the Test.
22] See and Check the results with new modifications.


For this parameterization also we will use a public site as an example i.e. www.redbus.in.
Follow the following steps :
To Parameterize the Booking scenario, first record the Booking scenario.
1] Add Thread Group Recording Controller and HTTP Request.
In HTTP Request > Server Name or IP : Enter http://www.redbus.in
2] Add a HTTP Proxy Server for the Workbench
3] Start the Proxy Server and open Mozilla Firefox and go to http://www.redbus.in.
4] After recording a few transactions, close the browser and stop the Proxy server in Jmeter. U get the below recordings.
5] Here we have seen the tickets from Mumbai to Goa on 07-Dec-2011
6] Now we will parameterize the values of fromCityName and toCityName using User Parameters.
For this do the following steps:
7] After recording the script first save it.
8] Create a new file in “text document” form in bin folder.
9] Enter the values for each thread or user in separate rows with fields separated by commas as shown in the screen shot.
10] Save the file as (file => save as) uservar.csv file in the same bin folder.
11] Now in the Apache_Jmeter window go to Options > Function Helper Dialog
12] Create new function with function type __CSVRead.
13] In the values column for CSV file to get values from give the file name (i.e. uservar.csv) from where values are retrieved. Give the complete path incase the file is not created in bin folder. InColumn number of CSV file give 0 as user ids are stored in first column and count will be started from “0”.
14] Then click on generate option to generate a function. Then copy the function string generated.
15] Now again goto Apache_Jmeter window.
Right click on thread group.
Then click on Add > Pre Processor > User Parameters to create a new userparameter.
16] The following window will be opened. Click on Add Variable tab to add a new variable.
17] Now in the name column give the name of the variable you want to replace (fromCityName) as “A” in this example and in the user_1 column paste the function string that was copied previously from the function helper window i.e., (${__CSVRead (uservar.csv, 0)}).
18] To parameterize more than one more variable then click on Add Variable. For parameterizing toCityName filed in Name field enter “B” and in User_1 column paste the generated function but change the column number to 1 i.e.,(${__CSVRead (uservar.csv,1)}).
19] After entering all the values that are to be parameterized click on Add Variable and in Namefield enter “next” and in the User_1 column paste the function string and replace 0 in the string withnext i.e.(${__CSVRead (testdoc.csv, next)}).
20] Find and replace the variable values that are to be parameterized with function strings.
In this example find fromCityName value and replace it with the function string that is ${A} and find toCityName value and replace It with function string ${B}.
21] Save the script and Run the Test.
22] See and Check the results with new modifications.
No comments:
Post a Comment